Simulating the TS808 Tube Screamer in LTSpice
I recently discovered LTSpice as a simulation tool for electric circuits. Despite some mild bitching about its hotkeys and UI, I’ve grown fond of it a lot more quickly than I expected to. It’s a powerful tool for gaining some quick insight into a circuit’s operation. I tend to be a hands-on learner, so the best way to get around the clunky UI was to get a little practice using it. (A little re-jiggering of hotkeys on my Mac may have also occurred, but I credit the practice being the bulk of the solution to my inexperience problem.) With that in mind, I figured I’d pick something relatively interesting to simulate: a guitar effect pedal.
My goal with this project was to produce a useful LTSpice model of the TS808 overdrive pedal. If you’d like to follow along with this writeup (or skip all the lame EE stuff), you can get the schematic at this link.
Note (10/22/2020): If you haven’t had a chance to look at the writeups for other pedals I’ve analyzed, those are available here:
- Simulating the MXR Dyna Comp Compressor in LTSpice
- Simulating the Boss GE-7 Graphic Equalizer in LTSpice
- Simulating the Schaller Tremolo Pedal in LTSpice
- Simulating the Dunlop Crybaby Wah Pedal in LTSpice
- Simulating the ProCo RAT Distortion Pedal in LTSpice
- Simulating the TS808 Tube Screamer in LTSpice
I’ve also posted all the LTSpice schematics I’ve made on GitHub - check them out!
The Target
I’ve recently become re-interested in analog electronic design. Since I’m a musician in addition to being an engineer, audio electronics have sort of naturally been the focus of a lot of my interest. Thus, I decided to focus on simulating one of the most popular guitar effects of all time: the Ibanez TS808 Tube Screamer.
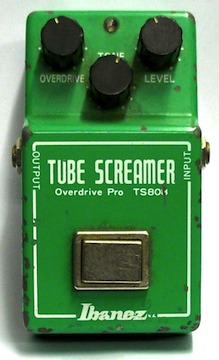
Figure 1: A Close-Up of the Subject
That name may not be terribly familiar to you, but you’ll likely recognize more than a few of it’s users. Stevie Ray Vaughan is widely credited with bringing the pedal to prominence; it was a big part of his guitar sound. Phish’s Trey Anastasio likes it so much he uses two in his pedal chain. It’s one of the most widely used distortion pedals in history. Given that, I was a little surprised at how much difficulty I had at finding a ready-made LTSpice model of it.
That’s some bullshit, and IT ENDS TODAY.
##The Circuit

Figure 2: The TS808 Circuit
You can divide the Tube Screamer circuit into four main sections: input buffer, clipping stage, tone/volume stage, and output buffer. There’s also a fifth switching stage, which is designed to select whether the input signal passes to the effect or jumps over it and goes straight to the output buffer. I left it out of the model and this writeup because, well… it’s just not that interesting. If you’d like to learn a little more about the switching stage, you can check out some of the resources in the “Further Reading” section below to see how it fits into the effect circuit.
The Buffers
I’ll break this analysis into three main sections: the input/output buffers, the clipping stage, and the tone/volume stage. We’ll cover the input and output buffers in one section, as they’re basically the same circuit.
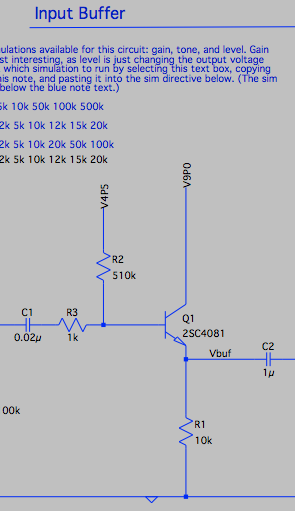
Figure 3: The Input Buffer
This is a riff on a common electronic theme known as an emitter follower. (I said “riff”, and it’s an article about guitar pedals. See what I did there?) It allows you to present a high input impedance to a signal source while presenting a low output impedance to the next link in the signal chain.
OK, that’s neat. How about again, in English?
As you can guess from the title of this section, these circuits are buffers. These buffers allow you to mess with your guitar signal without changing how it comes out of your guitar. You start to change the guitar output when the effect starts drawing too much current from the pickups, or changes the resonance point of the pickups by loading them electrically. An output buffer is there to help overcome this lack of buffering in any downstream pedals by providing a nice, clear signal to the next device in the pedal chain.
In egregious cases, a pedal can start to negatively affect your guitar’s sound. The reason? Crappy or nonexistent buffering. BUFFER YOUR AUDIO CHAIN.
(Aside: A little googling suggests wah-wah pedals seem to be particularly guilty of this. A little more googling for circuit schematics will reveal that these nice little transistor circuits are conspicuously absent from most wah pedals.)
The Clipping Stage
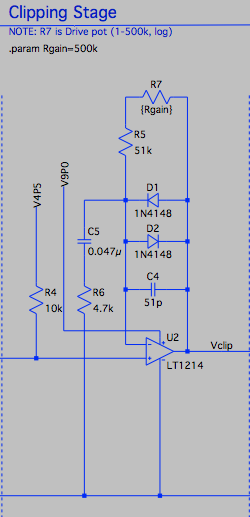
Figure 4: The Clipping Amplifier
Now we get to the star of the Tube Screamer show. The clipping stage is designed to amplify your signal and clip it off into a somewhat-square wave. What’s good about this?
The short answer: more harmonics. More high harmonics == richer sound.
The long answer: a sine wave is a signal made up of one frequency, whereas a square wave is a signal made up of a fundamental sine wave with added higher-frequency harmonics. Forcing a sine wave into an amplifier voltage rail makes it approximately square. When you distort a sine wave like this, you’re adding higher frequencies into the signal. In the context of an electric guitar, this creates that pleasant, fuzzy feeling that rock-and-roll has made so familiar to us: a distortion effect.
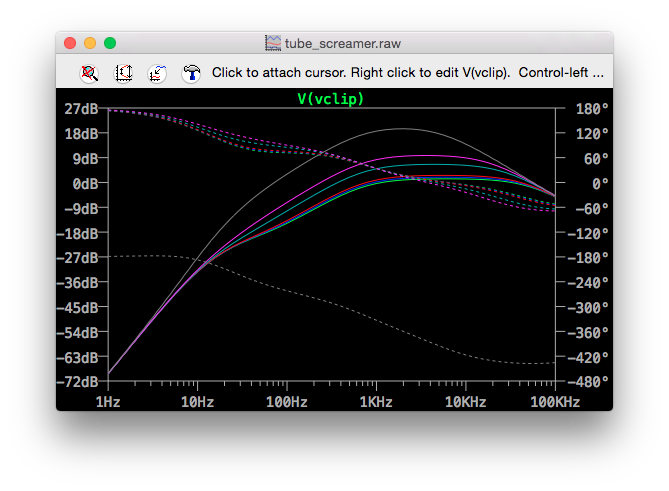
Figure 5: Sweep of Rgain vs. Vclip
A quick sweep of the gain feedback loop across audio frequencies shows a few key characteristics of the circuit. It gives a nice leveling of all of the frequencies from 1kHz right up to about 12kHz, where the 0.047uF/4.7k snubber starts to tamp down the higher frequencies in earnest. Higher Rgain values increase the height of this plateau, and also decrease that 1kHz-12kHz frequency linearity. This is a large part of why low Rgain settings allow the TS808 to function as a nice clean boost; you’re evenly boosting the whole signal, and not trying too hard to emphasize or reduce the higher frequencies. It’s only at higher gain settings do the real crunchy, distorted sounds start.
It’s also worth noting one other characteristic of the TS808 clipping stage. See those two diodes in parallel across the opamp output? Their purpose is to help limit the gain that this clipping amplifier can supply. The goal of this is to better emulate the distortion produced by an overdriven tube amplifier. Vacuum tubes tend to clip off railed-out signals with nice, round corners as they transition into a voltage rail. These yield warmer, acoustically pleasant overtones with even more harmonic content. Silicon transistors tend not to have this effects; hitting the voltage rail with a transistor brings the signal to a screeching halt. This can have effects that some people don’t find particularly pleasant. These diodes provide a nice middle ground: tube performance at semiconductor price points.
The Tone Stage
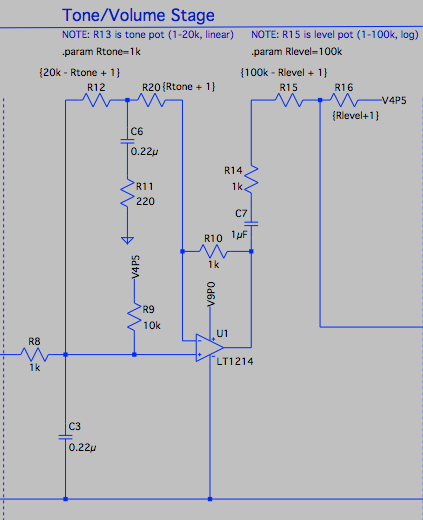
Figure 6: The Tone Circuit
The tone stage allows you to sculpt your overtone response a little more. Instead of changing the overall gain of the input signal, it introduces a lowpass element that rolls off higher frequencies based on the setting of Rtone. (Note that this schematic shows Rtone as two resistors; in the actual circuit, it’s just a potentiometer with the capacitive snubber connected to the wiper terminal.) It also shifts where the frequency gain peaks. For some of your lower notes in a guitar register, you’re actually boosting a lot of the overtones more than the fundamental frequency.
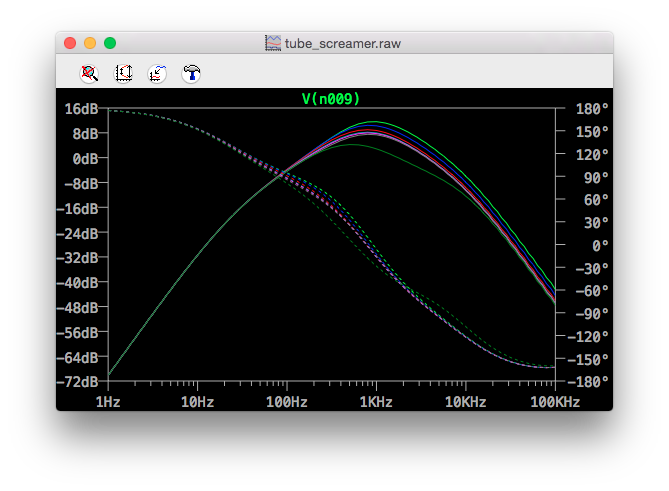
Figure 7: Rtone vs. U1 Out
Moral of the story: tone control allows you to pick where your signal starts to roll off. You can choose to minimize the higher harmonics for a cleaner sound, or emphasize them for a more distorted effect. It is the product to your guitar tone’s pompadour.
So How’s It Sound?
The folks at Reverb.com were kind enough give this nice demo of the TS808’s close cousin, the TS9, at various settings for your listening pleasure.
Acknowledgements and Further Reading
Mine is not the first writeup of the TS808, and not even close to the best. For that, I’d have to direct you to the excellent Electrosmash article giving a complete rundown of the Tube Screamer circuit. I’d also highly recommend R.G. Keen’s “Technology of the Tube Screamer”, which I used as my primary schematic resource for this simulation.
I’d also like to give Renato Montenegro, Grand Dragon of Guitar Effects, a shout out for feedback and guidance on this model. You can check out Renato’s work with shoegaze band bummed on Bandcamp.